|
(818) 762-0884 North Hollywood, CA Prices Subject to Change Without Notice Please click here to report broken links or other site problems. Thank you! |
| Lighting Systems 1..2..3 |
 |
| Some Basic Information |
| We Package Lighting and Dimming Systems. Mail or FAX your specifications. |
| If you would like assistance in planning your system, give us a call. |
| See Also: Dove Systems, Elation, ETC, Leprecon, Leviton, Strand |
|
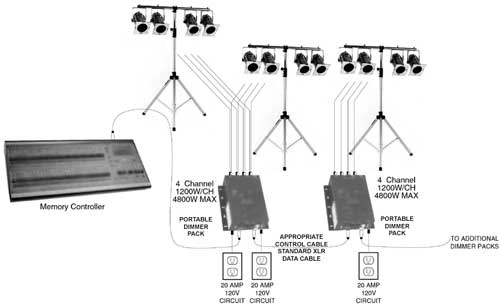
A basic lighting system consists of a dimmer and a controller
which are connected to lighting fixtures by means of electrical
cable. The first limitation to assembling a lighting system is your budget. The second limitation is the amount of electrical power you have available to power the lights. Electrical power is spoken of in terms of AMPS (amperes). A typical household socket is rated at 20 AMPS, as are those in churches and schools. These circuits, which terminate in electrical U-ground wall outlets are protected by a circuit breaker which is located in a circuit breaker box. This box is the electrical Power Distribution box. The total AMPS of the box is the limiting factor in designing a lighting system. The more 20 AMP circuits you have available the more dimmers, and thus the more lights you can use. So, the first thing you need to find out is how many AMPS are available for just the lighting system. Please, no coffee pots, air conditioning, sound systems or other electrical devices on this power, while doing a show, if at all possible. If you're designing a large system you need to know if you have single phase or three phase power. This is something your electrician or contractor can tell you. Once you have determined your budget and the available electrical power, it is easy to design the lighting system. |
 |
|
All portable stage lighting dimmers and controllers are made to connect using standard cables and connections. It's as easy as 1...2...3 ! |